
This will be the first post in a series of ‘How To’s’ that will follow. I decided to post this info so that instead of emailing everyone an answer, I can direct them here.
One of the most frequently asked questions I get other than which camera to buy, which is a whole other post, is how do I watermark my photos? It thought I would take this opportunity to share it with you all in a post so it can be easily referenced.
Watermarking is important as it helps to discourage people from stealing your photos at the same time leaving your mark to say that you took that photo.
Since there are different ways to process your digital photos, I should specify that I will give instructions for Photoshop Elements in two parts and Photoshop in two parts. These are the two that I am most familiar with. If you only use software that came with your computer, as long as you can type words onto your photos, then you can watermark them.
Photoshop Elements (PSE) – Part 1:
Method 1 – fast and furious:
If you have a lot of photos to process and upload this is the fastest method. It uses the batch processing tool.
1. Open files to be processed and make your adjustments if necessary.
2. With your files open, click on Files -> Process Multiple Files. A dialogue box will appear like this:
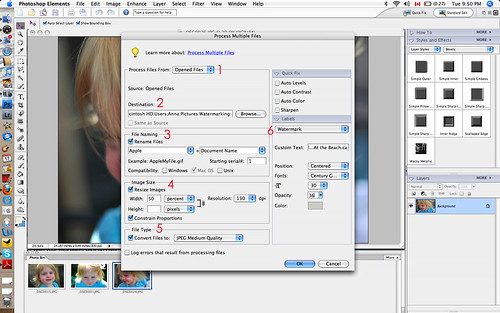
- Make sure to select open files.
- Choose a destination folder where the new files will be saved. I have a folder that I call ‘Watermarking’ and this is where all of my watermarked photos go for uploading to my blogs.
- File Naming. You can choose to rename your file or leave it as is.
- Image size. I save my watermarked images to 50%, smaller photos use less room.
- File Type. This is another key thing in watermarking. I choose Medium Quality so that I know that I am not putting a High Resolution print on the web. A lower resolution will not allow for a good print if someone wishes to do that.
- Is where you fill in your watermarking info. This is a very simple watermark. Type in your text, choose where you want the text to show up, the font, size, opacity (the lower the opacity the less visible) and colour and you are set to go.
Click ‘OK’ and your files will be saved to your Watermarking folder, ready to be uploaded to your blog or photo sharing web site.

And that concludes the first lesson in Watermarking. Part 2 will demonstrate how to do something a little more fancy with PSE.
Good afternoon Anna!
I am just starting out and am quite the amateur in photography.
Your instructions on creating watermarks is a god send! Thank You!!
I have an email address, a domain name (web site NOT up and running just yet)
and an account on Etsy (not up and running either), all with the same name.
Now that was a challange.
Thanks again for your help.
I truly appriciate it,
Kathy
You are welcome Kathy. I do have another one to post that can be done with Photoshop, just need to find the time to get it up on the blog. Best wishes with your photography.
These are wonderful directions. I have been watermarking with a batch process and last night when I went to do it all my settings had disappeared. My problem now is that the watermark is TINY? Does this have to do with my picture file size? Any advice would be greatly appreciated as I spent 4 frustrating hours trying to figure out what I had not put in correctly for settings.
Teresa
Hi Teresa,
The watermark can be tiny for two reasons, the file size or the font size. You should have the option to choose a larger font. I would try this first (just grab one photo and run it through the batch process) if that doesn’t work try using a larger size photo. If you are starting with a smaller photo and are shrinking it even more then yes the watermark will come out pretty small. I am usually shrinking a large file down to a smaller one when I run this process.